Authentication with Auth0 in Next.js: A Complete Guide on Sessions and Tokens
Integrating Auth0 into your website or app can feel like navigating a maze of tokens, sessions, and more. In this comprehensive guide, we'll unravel the complexities surrounding Auth0 sessions and tokens within a Next.js application. This post will help you pave the way for a seamless authentication experience in your application.
By Senne Dirkx
On Sun Feb 04 2024

If you’re building applications that aim to provide the user with a personalized experience and service, authentication is and will be a key component of your product. Authentication allows the user to register, log in and securely access APIs. You cannot afford your authentication to break. If your users cannot access your service, it renders your service useless. Building a reliable, secure and user-friendly authentication experience is a difficult challenge. If you’re building a product, your focus should be on building the core functionalities of that product and less so on the authentication part (but that doesn’t mean you shouldn’t learn how authentication works).
That is why companies of all sizes, from enterprises to indie hackers, often choose an authentication-as-a-service (AaaS) provider to handle the authentication part for them. There are many of them out there including but not limited to: Auth0, AWS Cognito, Clerk and Firebase Auth. And although these providers handle 99% of the authentication flows for you, integrating them into your applications can be a struggle. This is especially true in a world where meta frameworks like Next.js, Nuxt, SvelteKit or SolidStart seem to complicate the web even more.
In this post, we’ll unravel the complexities of integrating an authentication-as-a-service provider with a meta framework and shed light on the key concepts and best practices surrounding login sessions and tokens. At the core, many of these authentication providers and meta frameworks are very similar. In this article, we’ll focus on the combination of Auth0 and Next.js as they both are popular options in their respective product category.
What does an authentication provider offer?
An authentication-as-a-service provider like Auth0 can offer many different things for your product, such as multi-factor authentication (MFA), protection against malicious login attempts, progressive profiling and much more. But at the core, it handles every step from the user clicking on a “login” or “register” button to your application receiving a “login session”. But how do you use this session and the tokens it contains to provide a personalized experience for your users? How can you let the user stay authenticated for extended periods of time in a secure manner? And what do you do if the session or its tokens expire?
Token-based authentication
In the context of web and mobile applications, the state-of-the-art way to do authentication is using token-based authentication using the Open ID Connect (OIDC) protocol. It is an effective choice for sharing authentication between services without sharing the credentials. It is flexible, secure and widespread. This is one of the authentication mechanisms that Auth0 and many other providers offer, and is the one we’ll be studying in this post.
JWT
Token-based authentication uses JSON Web Tokens (JWTs). A JWT (commonly pronounced as jawt) is a compact, URL-safe means of representing claims between two parties. These claims are used to transmit information about a user in a secure and tamper-proof manner. A JWT is comprised of three sections: a header, a payload, and a signature. These sections are encoded in Base64 and concatenated with dots. The resulting JWT has the format: header.payload.signature. The header contains information about how the JWT is signed and what type the token is. The payload holds the claims, which are statements about the user and perhaps additional data. The signature ensures the integrity of the JWT by securing the previous two sections using a secret key. The most important property of a JWT is that anyone can see what the payload is, but only if you have the secret key can you alter the contents inside. This is the principle that systems rely on to authenticate users. Informally, you could say “The system receives a request containing a JWT with payload User ID = 55, no one from the outside could’ve altered it so it must really be user 55”.
A nice tool for debugging JWTs is jwt.io. You can paste the following example jwt there to see its contents:
eyJhbGciOiJIUzI1NiIsInR5cCI6IkpXVCJ9.eyJzdWIiOiIxMjM0NTY3ODkwIiwibmFtZSI6IkxlYXN0IEN5Y2xlcyIsImlhdCI6MTUxNjIzOTAyMn0.0cg1aQ9TFIlwbWRe6RATK0C0S07rBo1EZtb5t4Igu8YDifferent Types of Tokens
Auth0 provides different types of tokens for a user’s login session, each serving a specific purpose in the authentication process. These tokens include:
- Access Tokens: Access tokens are used to authorize and authenticate requests to protected resources, such as (external) APIs. They typically contain information such as the user’s identity, permissions (scopes), and other details needed by the resource server to determine if the user has the necessary permissions to access the particular resource.
- ID Tokens: ID tokens contain personal user information, such as their name and email address. They are often consumed by the client-side of an application to show user information. This avoids the client having to fetch the user’s information on every page visit from a backend resource. Therefore, an ID token is actually a client-side cache for the user’s information.
- Refresh Tokens: Refresh tokens are used to obtain new access and ID tokens without requiring the user to (manually) re-authenticate. They generally have a much longer lifespan than access tokens and are solely used to securely maintain a user’s session.
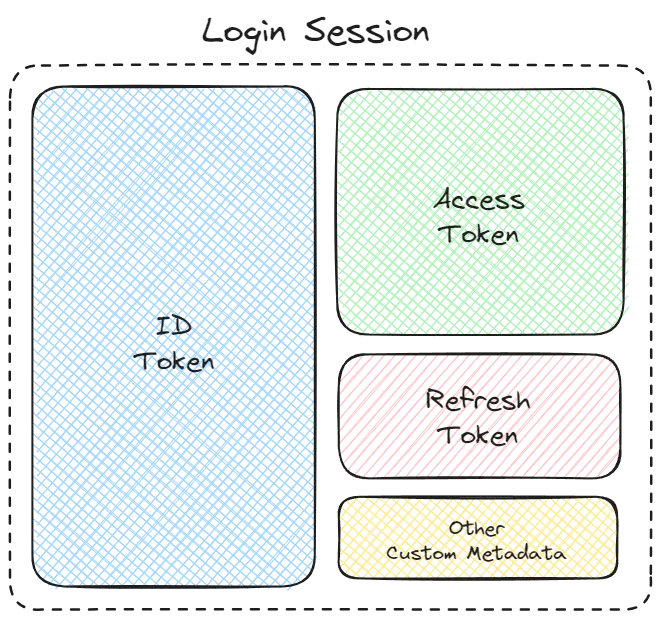
Login Sessions
All of the tokens mentioned in the previous section are stored within a user’s login session. A session is established when a user logs in and lasts until the user logs out or the configured session lifetime limit is reached. Sessions can, apart from the aforementioned tokens, store other information temporarily while the user is connected, allowing the application to maintain additional state related to authentication for a smoother experience. Sessions will be stored at three different locations when using a meta framework like Next.js:
- Application-level session: This session determines whether a user is authenticated for your particular Next.js application.
- SSO session: Single Sign-On (SSO) sessions allow users to authenticate once and access multiple applications without re-entering their credentials. Auth0 manages the SSO session on their authorization server and handles authentication across multiple applications for you.
- Identity Provider (IdP) session: When a user logs in using an external identity provider (IdP) like Facebook or Google, a separate session is created or maintained on the IdP server. This session can be used for seamless Single Sign-On (SSO) experiences across multiple (unrelated) applications. Since there is a high probability the user was already logged in to Facebook or Google before accessing your application, the user must do even less manual action to log in to your application.
The application-level sessions are most relevant to you because those are the only ones you are in direct control of and where things can go wrong. Now, you may wonder: where is this application-session exactly stored in my application? They are (most often) stored in the user’s browser as an encrypted cookie. The session can only be decrypted on the server-side and thus the contents (the tokens and other metadata) of the session are only accessible on the server-side of the meta framework. This is done for extra security against XSS attacks.
Then how do we get the access token to able to send it to an external API for making authenticated calls? This can be achieved by making a proxy between your client and the external API using Next.js API routes, Server Components or Route Handlers running on Vercel edge functions or any other server. But it will be helpful to know that Auth0 has a nicely maintained Next.js SDK.
With the different types of tokens contained within sessions at different levels, possibly all having different lifetimes, things can get complicated quickly. The next section gives an overview of the integration required from the application developer’s perspective and how this ties into the different tokens and sessions.
Integrating authentication into your application
The basic setup
Getting a barebones set up with Auth0 in a Next.js project is a breeze. You need to perform the five steps below. This is best done using the nice quickstart guides they provide.
- Configure an Auth0 tenant & application
- Install and configure the SDK in your Next.js project
- Add the Auth0 API routes/handlers
- Add login & logout buttons
- Wrap your application in the UserProvider and show user profile information
Authenticate HTTP requests to APIs
If you’re building an online service or product, it’s highly likely you need to communicate with an (external) backend API. You will have to configure this API in the Auth0 dashboard under Authentication > APIs. You are free to choose the APIs audience and scopes.
Next, we must create an API route that unpacks the access token from the encrypted cookie and adds it as a bearer token in the Authorization header. You may take some inspiration from the following barebones snippet from my app/api/[...proxy]/route.ts that runs on the Vercel edge functions:
import { getAccessToken } from '@auth0/nextjs-auth0/edge';
import { NextRequest, NextResponse } from 'next/server';

const handler = async (request: NextRequest) => {
  let token = null;
  try {
    const response = new NextResponse();
    const { accessToken } = await getAccessToken(request, response);
    token = accessToken;
  } catch (e: any) {
    console.error('Cannot get access token.');
    console.log(e);
    return new Response(e, {
      status: 500,
    });
  }

  try {
    if (token) {
      request.headers.set('Authorization', `Bearer ${token}`);
    }

    // Extract the necessary components from the original request
    const originalURL = new URL(request.url);
    const basePath = process.env.NEXT_PUBLIC_API_BASE_URL; // Your base path
    const newPath = originalURL.pathname.replace(/^/api/proxy/, '');
    const queryString = originalURL.search; // Query string
    const hash = originalURL.hash; // Hash

    // Construct the new URL using string format
    const newURLString = `${basePath}${newPath}${queryString}${hash}`;
    const newURL = new URL(newURLString);

    // Next.js adapted the fetch implementation that forces caching on a success response. We don't want that.
    const response = await fetch(newURL.toString(), { ...request, cache: 'no-store' });

    if (response.status === 401) {
      console.error(`Received 401 Unauthorized from backend API.`);
    }

    return new Response(response.body, {
      status: response.status,
      statusText: response.statusText,
      headers: response.headers,
    });
  } catch (e: any) {
    console.error(`Received 500 Internal Server Error from backend API.`);
    console.log(e);
    return new Response(e, {
      status: 500,
    });
  }
};
Passing the access token of the user’s session in the authorization header of the HTTP requests allows the backend API to associate these requests with the particular user. The Next.js SDK provides nice middleware functionality for this: the withApiAuthRequired wrapper. I suggest you use this if all your backend endpoints require authentication. The code snippet above does not use this SDK middleware as in that instance we wanted to allow anonymous endpoint requests to be proxied as well.
If it’s your own backend API, you will have to take care of token validation on the server-side as well.
Understanding session and token expirations
The user is browsing your application and suddenly the login session and/or tokens expire. How should this be handled? There are several different scenarios you must cover, although the SDK handles most scenarios automatically. Let’s delve into what can expire and what the implications are.
Token expirations
ID tokens and access tokens are both intended to be short-lived tokens. As mentioned before, ID tokens are a cache for user-specific information. By default, Auth0 gives them a 10 hour lifetime. Access tokens are used to access protected (external) APIs. By default, Auth0 gives them a 24 hour lifetime. If an ID token expires, its user information contents are invalid and outdated. If an access token expires, the backend APIs for which it is used should respond with a 401 Unauthorized response on subsequent HTTP requests.
Apart from manual re-authentication, using a refresh token is the only way to obtain new ID and access tokens. Refresh tokens are intended for longer lifetimes: often weeks, perhaps months or sometimes even a year. When an ID token or access token has expired, the user can perform manual authentication to receive another set of these tokens, or the refresh token can be exchanged for a new pair of ID and access tokens. When the user’s refresh token expires, the user must perform manual authentication.
Refresh tokens are not automatically enabled when using Auth0. You must include the offline access scope in the authorization parameters of the login request. And on top of that, you must also enable offline access for the specific external API in the Auth0 dashboard.
Session lifetimes
A login session in Auth0 has two types of lifetimes. There is an absolute lifetime, which specifies how long a session should remain active, regardless of user activity. And then there is an inactivity timeout, which is the timeframe after which the session expires if the user hasn’t interacted with the application. If any of the two lifetimes are crossed, the session login session expires and the user must re-authenticate. These lifetimes are configurable in the tenant settings on the Auth0 dashboard. But these tenant settings only apply to the SSO session on the Auth0 authorization server! Changing these lifetimes on the Next.js application level requires you to modify the Next.js SDK configuration using environment variables.
Remember what the contents of the session were? The tokens. This means that if the application-level session (stored as a cookie in the browser) expires, you will not be able to pass it as a cookie to the (server-side) API route anymore. And thus it will render all the tokens it contains useless, even if the tokens themselves have not yet expired. This means that you can have an expired session that contains valid tokens and you could have a valid session containing expired tokens.
Therefore, it is critical to think about your application’s needs and security requirements and configure the lifetimes accordingly.
To me personally, if a refresh token is used, it makes the most sense to make the absolute lifetime of the login session the same as that of the refresh token. Otherwise, the refresh token will always become unusable before it expires. Would love to hear your thoughts about this!
Balancing security and user experience
If security is absolutely critical in your application, you should use impose a very limited lifetime on all of the tokens and refresh tokens should not even be used. However, this does not provide a very practical user experience, since users must manually login often. Therefore, they could be more inclined to abandon your product. As engineers, we must find a good balance between the necessary security measures and a great user experience.
Conclusion
In conclusion, authentication is a pivotal aspect of any application, ensuring user registration, login, and secure API access. Building a robust and user-friendly authentication system is challenging, but Authentication-as-a-Service (AaaS) providers like Auth0 offer solutions for various complexities.
Our focus on integrating Auth0 with Next.js revealed insights into token-based authentication using JSON Web Tokens (JWTs) and the Open ID Connect (OIDC) protocol. Together with login sessions as cookies, holding these tokens, come with diverse lifetimes, influencing the user experience. Managing token and session expirations in the context of Next.js integration presents unique challenges that require careful consideration.
Developers must strike a delicate balance between security and user experience. While shorter token lifetimes enhance security, practical user experience often demands a more lenient approach.
In navigating the intricacies of authentication integration, aligning our approach with the specific requirements of our applications allows us to deliver a secure and seamless authentication experience, enhancing overall user satisfaction.